# Vuepress搭建个人博客网站
拥有个人网站性价比最高的方法就是把网站放到github上,不用自己花钱买服务器开发,也不用考虑续费的问题。此篇文章主要讲述如何用vuepress在github上部署一个个人博客网站。咸鱼漫步,多多指教啊🤡 📑 此处附上Vuepress官方文档
# 一、准备工作
1️⃣ 在github上新建一个仓库
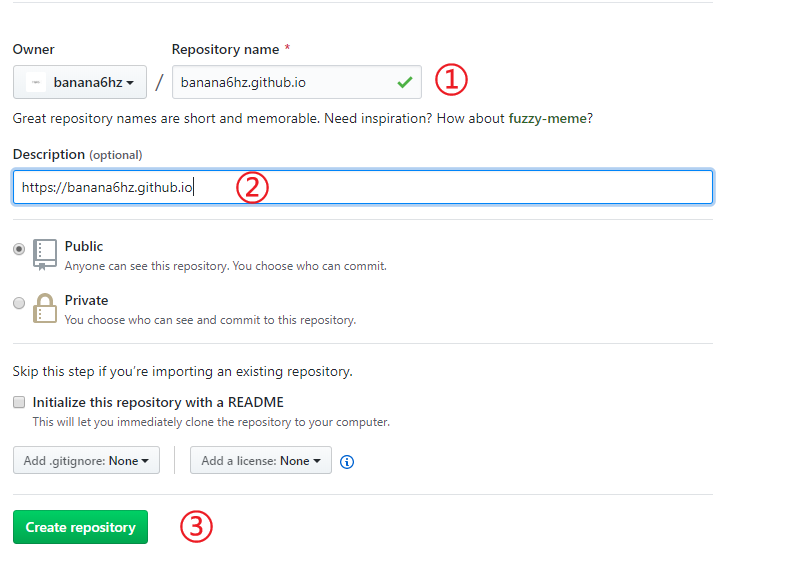
① 仓库名称:此处的仓库名称是固定的 github用户名 + .github.io 这正是你博客的地址
🌰:如果用户名为banana,则此处应该填:banana.github.io
② 仓库描述: 用户可自定义仓库的描述,方便读者了解此仓库的主要用途,此处放的是博客链接
③ 建立仓库
2️⃣ 环境搭建
① Node>8
② Git
③ npm
# 二、搭建vuepress项目
1️⃣ 全局安装vuepress npm install -g vuepress
2️⃣ 初始化项目
mkdir vurpressBlog
cd vurpressBlog
npm init
mkdir docs
cd docs
touch README.md
mkdir .vuepress
cd .vuepress
mkdir .public
touch config.js
🎄项目结构
.
├─ docs
│  ├─ README.md      homepage信息
│  └─ .vuepress
│     ├─ public      存放静态文件如favicon.ico
│     └─ config.js   项目配置文件
└─ package.json
3️⃣ 配置文件
✧ package.json:添加两条启动命令
"scripts": {
        "dev": "vuepress dev docs", //启动项目
        "build": "vuepress build docs" //打包项目
    }
此时运行 npm run dev 就可以打开页面了
✧ config.js:添加以下代码,并根据路径创建相关文件
module.exports = {
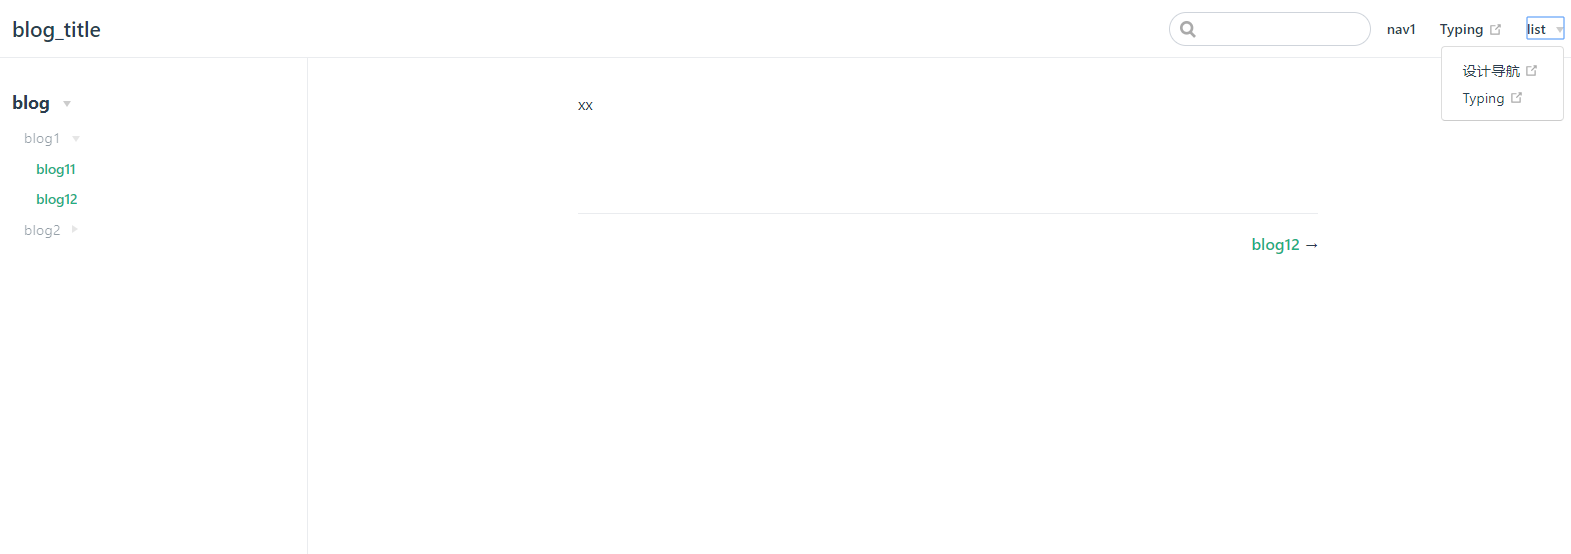
title: 'blog_title', //网页标题
decription: 'sss', //网页描述
// 注入到当前页面的 HTML <head> 中的标签
head: [
['link', { rel: 'icon', href: '/favicon.ico' }], // 增加一个自定义的 favicon(网页标签的图标)放在pulic文件夹下
],
base: '/', //这是部署到github相关的配置
markdown: {
lineNumbers: true //代码块显示行号
},
themeConfig: {
sidebarDepth: 2,
lastUpdated: 'Last Updated', //文档更新时间:每个文件git最后提交的时间
// 头部导航栏
nav:[
{text: 'nav1', link: 'blog/guild'}, //内部链接以docs为根目录
{ text: 'Typing', link:'https://www.keybr.com/'}, //外部链接
{text: 'list',
items:[
{ text: '设计导航', link:'http://hao.shejidaren.com/'},
{ text: 'Typing', link:'https://www.keybr.com/'}
]
} //下拉列表
],
sidebar: {
// 侧边栏在 /blog/上
'/blog/': [
{
title:'blog',
collapsable: true,
children: [
{
title:'blog1',
collapsable: true,
children: [
['/blog/guild','blog11'],
['/blog/guild','blog12']
]
},
{
title:'blog2',
collapsable: true,
children: [
['/blog/guild','blog12']
]
}
]
}
]
}
}
}
 ✧ README.md:添加以下代码
---
home: true
heroImage: /header-bg.jpg
heroText: 👩💻
tagline: Cogito Ergo Sum
actionText: Banana
actionLink: /guild/install
features:
- title: '今天也要加油鸭🦆'
details: '咸鱼🐟漫步,每天进步一点点🤪!'
- title: 'HAPPY NEW YEAR🎇'
details: Only if you ask to see me,our meeting would be meaningful to me.
footer: © 2020-present Six_Banana
---

# 三、部署到Github
1️⃣ 配置base
① 如果你打算发布到 https://<USERNAME>.github.io/,base 设为 base: "/"。( base 默认即是 "/"。)
② 如果你打算发布到 https://<USERNAME>.github.io/<REPO>/(也就是说你的仓库在 https://github.com/<USERNAME>/<REPO>),则将 base 设置为 base: "/<REPO>/"。
2️⃣ 命令行推送 💢 需要注意的是推到线上的是dist文件夹里面的内容
cd docs/.vuepress/dist //npm run build 将项目打包到dist文件夹,(已经将md文件渲染成html文件)
git init
git add .
git commit -m 'update'
git push https://github.com/<USERNAME>/<REPO>.git master
💁♀️然后访问https://<USERNAME>.github.io见证奇迹(第一次可能延时个一分钟左右)
3️⃣ 脚本推送
① 在project的根目录下,创建一个deploy.sh文件:
#!/usr/bin/env sh

# 确保脚本抛出遇到的错误
set -e

# 生成静态文件
npm run docs:build

# 进入生成的文件夹
cd docs/.vuepress/dist

# 如果是发布到自定义域名
# echo 'www.example.com' > CNAME

git init
git add -A
git commit -m 'deploy'

# 如果发布到 https://<USERNAME>.github.io  USERNAME=你的用户名
# git push -f git@github.com:<USERNAME>/<USERNAME>.github.io.git master
git pudh -f https://github.com/banana6hz/Work.git master
# 如果发布到 https://<USERNAME>.github.io/<REPO>  REPO=github上的项目
# git push -f git@github.com:<USERNAME>/<REPO>.git master:gh-pages

cd -
② 设置package.json:
{
  "scripts": {
    "d": "bash deploy.sh"
  }
}
③ 执行命令:npm run d
🎄项目结构
.
├─ docs
│  ├─ .vuepress
│  |  ├─ dist
│  |  ├─ public
|  |  └─ config.js
|  ├─ blog
|  |  └─ guild.md
│  └─ README.md
├─ node_modules
└─ package.json
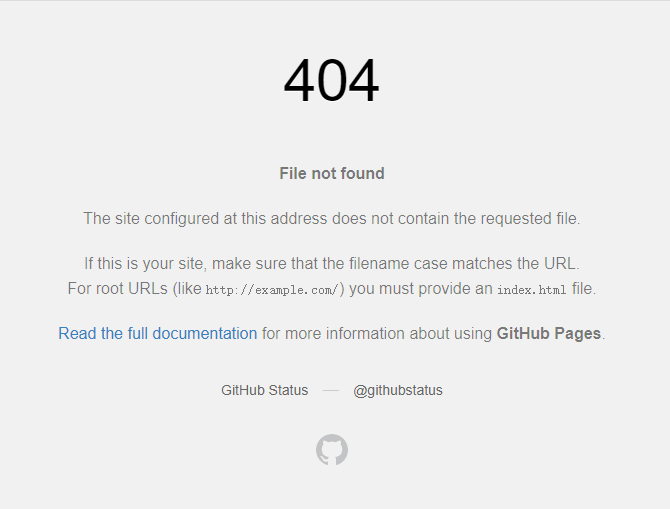
💢💢 偶尔会出现这样的页面❌那就再build一次再push就好了
← Git指南 markdown指南 →